

User creation/editing interface. It consists of the following fields:
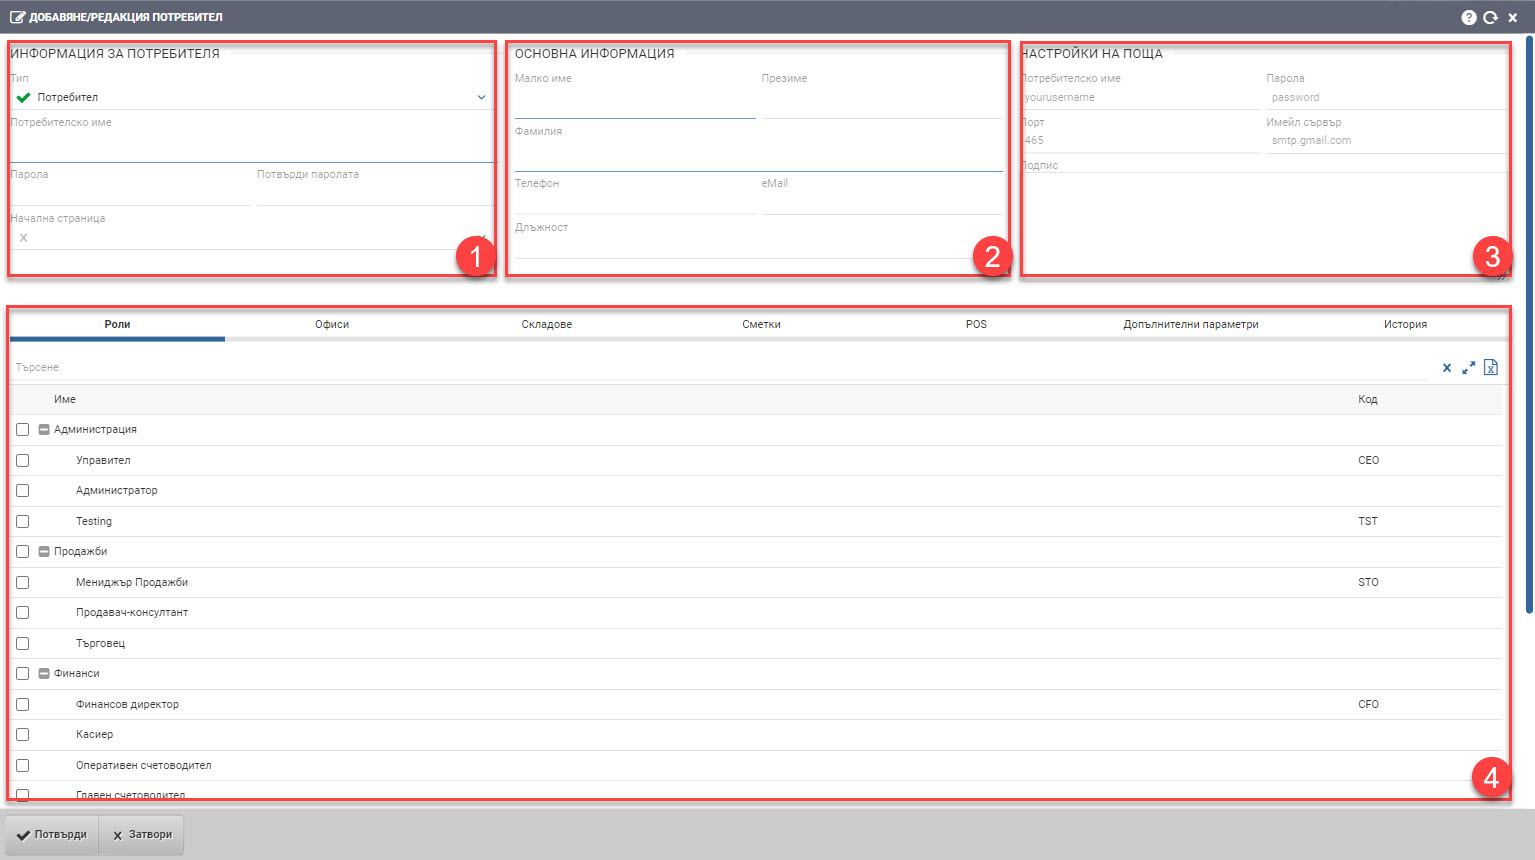
User Information (1)
Here you fill in:
- User type* from the following options:
- Inactive user. It is created to reflect an employee who will not actually work with the system, but needs to be present in various functionalities for the company’s needs. Present as an option in various interfaces and software modules. Not involved in determining the number of users of a particular company.
- Blocked. The blocked user has suspended privileges and cannot log into the system. Everything created by him in the software is present as documents, operations, history. It is present as an option in various interfaces and modules of the software. Not involved in determining the number of users of a particular company.
- User. Active users are the people who actively use the functionalities of the system to which they have access. Participates in the determination of the number of users of a particular company.
- Admin. Administrators are the key users in the system who have rights to create users, roles and configure the system. Usually it’s the user we’re communicating with an implementation consultant about that has exclusive rights.
- Username*
The username you use to log in to the system is private and is not given to others. Once a new user has been confirmed, it cannot be changed.
- Password and password confirmation
Password is not a required field. If you enter nothing, the user will be able to log in without a password. This is handy when initially setting up users, but always warn users that the first thing they need to do is put a password on after logging in.
- Home Page
You can choose which will be the first page of the system that the user will see when logging in.
Basic information (2)
In the Basic Information fields, you fill in the personal data of the user being created:
- Little name*
- Surname
- Surname*
- Phone
- Position
Mail settings (3)
The settings are optional and are used when working with Events and sending documents through the system. In addition to these settings, access must be provided to the appropriate mail system through which the user will be integrated to allow third-party IMAP/POP3 mail (Enable IMAP and/or POP3; Enable Third-Party Mail Clients).
- Username*
- Password*
- Port* – port number, by default 993, 995 or 465 (for IMAP, POP3 or SMTP)
- Email server* – address of an email server, for example smtp.gmail.com
- Signature – text that will be finally attached to the emails sent
Infusions of rights and roles (4)
The system makes it possible to give basic rights to the user when creating it. The settings are optional, but you can make them via the relevant tabs:
- Roles. Choose which role(s) the user will be placed in. Access to information, interfaces and what functions it will be able to perform in the system largely depends on this.
- Offices. Choose which office(s) the user will have rights to see and work for.
- Warehouses. Choose for which warehouse(s) the user will have rights to view, move and be MOL.
- Bills. You select for which account or cashier(s) the user will have rights to view, move and be MOL.
- POS. You choose for which POS the user will be a merchant.
Edit and change password
You can change a user’s password at any time by entering a new password in the Password and Password Confirmation fields in User Information (1).
Important! Username cannot be changed!