

Revision and Revaluation are the last operations that are executed for the day by the system!
Revision and Revaluation lock the warehouse in which they are performed! As long as the transaction is not confirmed or denied, no one in the system will be able to pick or stock in the revised warehouse. The operation of the warehouse can be resumed only after the confirmation or rejection of the revision.
Revision is synonymous with Inventory and is only used to change quantities in the warehouse! It does not change unit or total cost. They are adjusted by the operation Revaluation.
Our recommendation is to do the Revision/Revaluation in stages that include few items ( can be by groups, brands, etc). If your warehouse is divided into sub-warehouses/sections it is better to do them separately.
Usually after each Inventory a Revaluation is done to add/adjust the cost.
The interface consists of Header (1), Filter (2), Result (3) and Configuration for how rows are added (4):
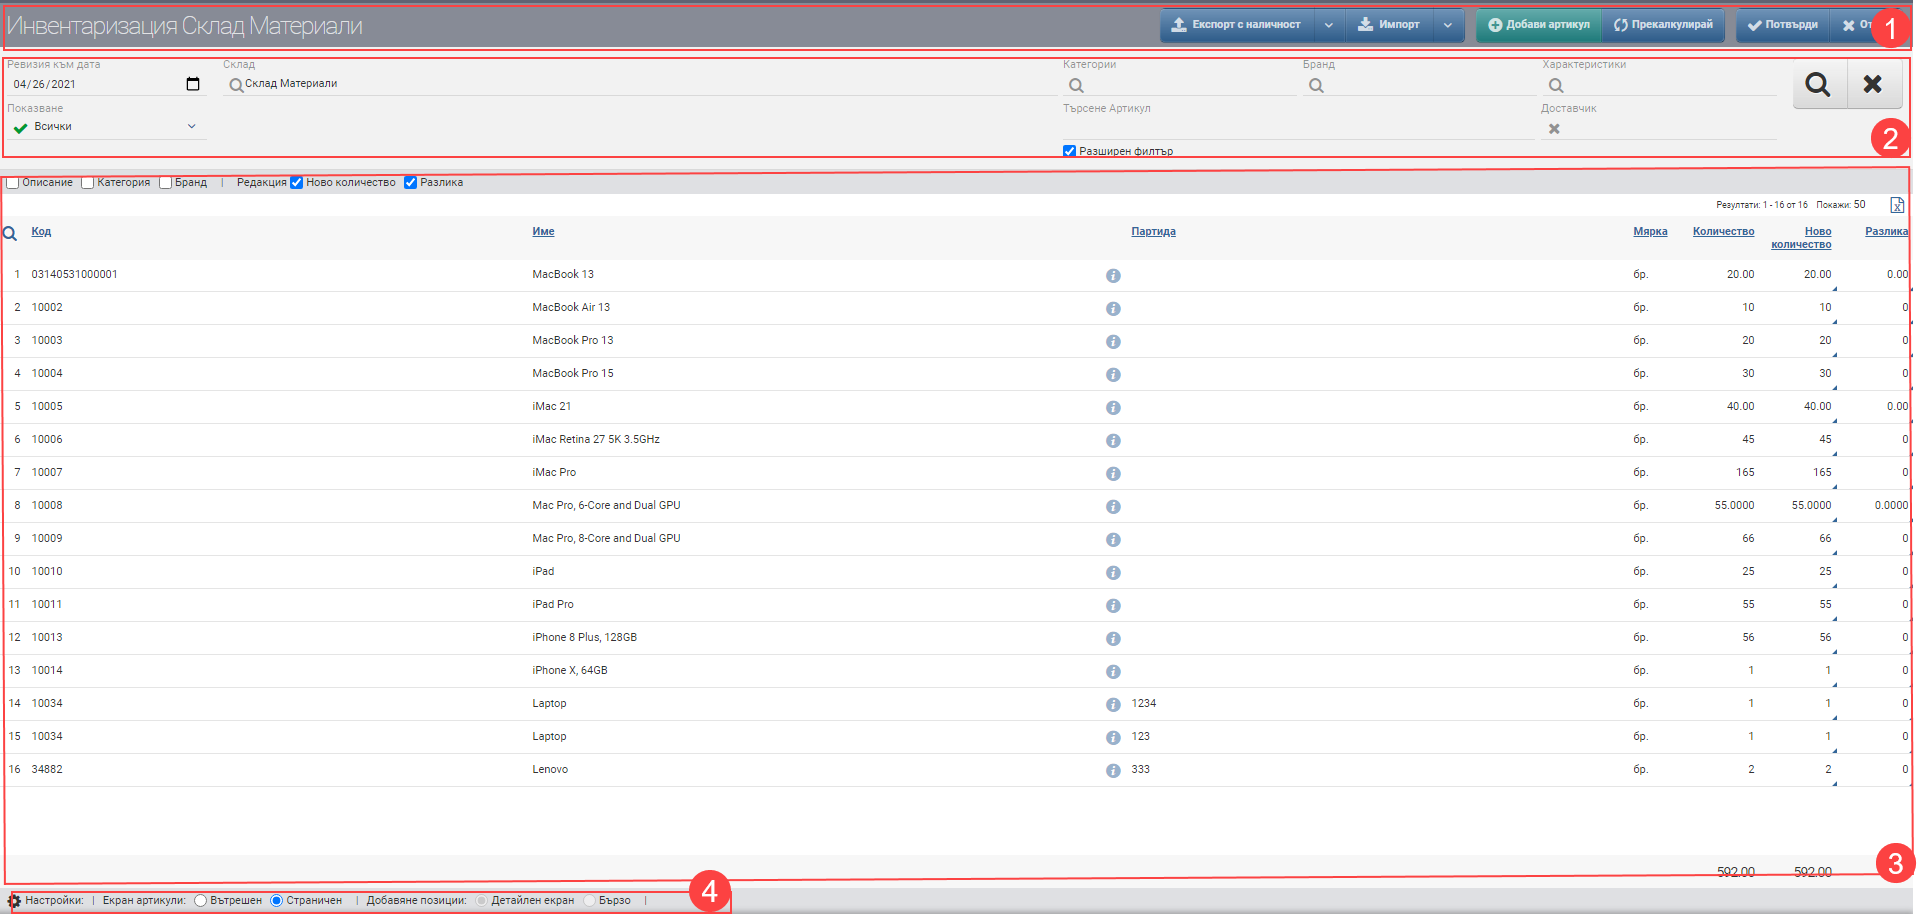
Header (1)
In the Header (1) you see the name of the document you are creating and a few buttons whose actions are explained below:
| Button | Possible options | Description |
| Export with availability | ||
| Export with availability | Generates an xls file containing only the items in stock. | |
| Export all | Generates an xls file containing all items that were in the warehouse on the selected date, including those with a zero or negative value. | |
| Export filtered | Generates an xls file containing all the items that are in the Result, with the system taking the specified filters into account. | |
| Import | ||
| Import | Opens an interface for importing rows from Excel. | |
| Import of unit quantities | Opens an interface for importing rows from Excel. | |
| Add item | Opens an interface for adding items from the nomenclature. It is used to add an item that was not previously in the warehouse. | |
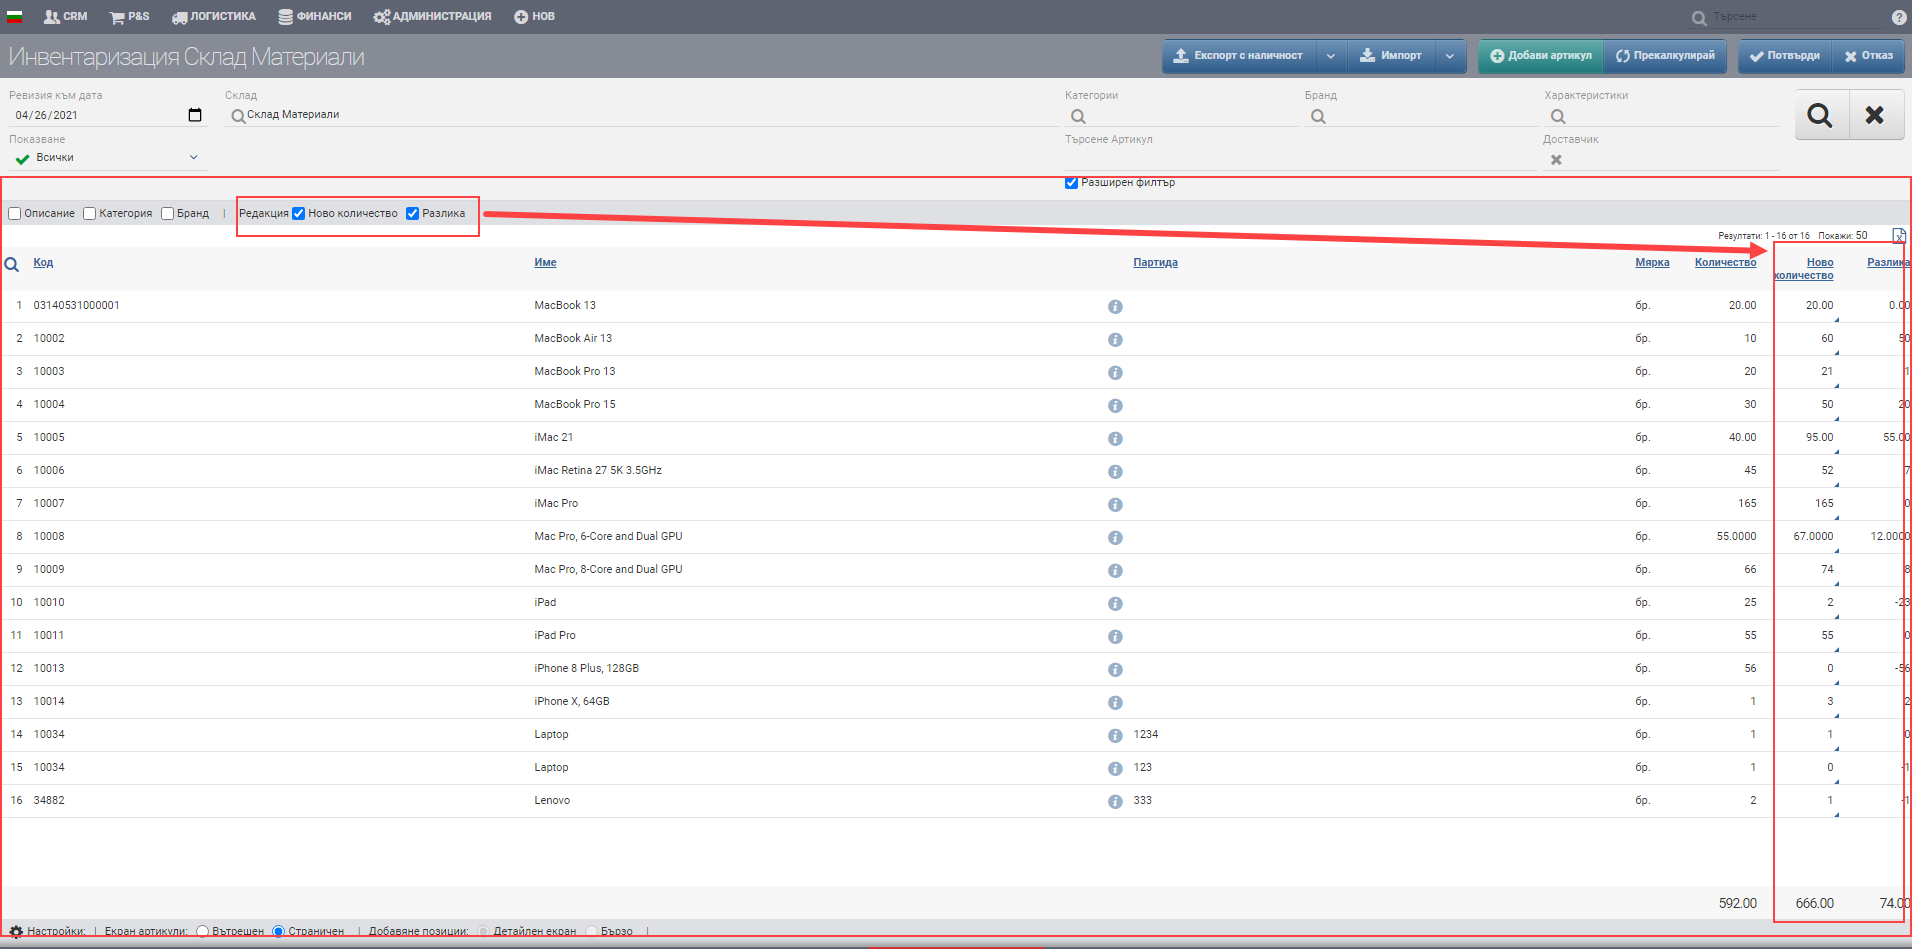
| Recalculate | Calculates the values in the Summary (the total at the end of the table) of the Quantity, New Quantity and Difference columns.) | |
| Confirm | Save the changes and enter the Revision Confirmation interface. | |
| Refuse | You reject the changes and do not save the Revision. |
Filter (2)
| Filter | Possible options | Description |
| Availability to date | You indicate on which date you will make the Revision. | |
| Warehouse | Displays the name of the warehouse/subwarehouse where you are doing the Revision. If the warehouse has sub-warehouses, you can do an Audit of all sub-warehouses or only selected ones. | |
| Search item | In the free Search box you can search by word, code, brand, etc. to find the item you want. | |
| Extended article | You also have the option to include an Advanced Filter with Categories, Brand, Features and Supplier, which can help you find items faster. | |
| Retrieved from | Controls which items you will see in Result (3). According to the selected value of the list, listed below, you can keep track of how far you have got in the Revision, make reports on the counted items, the changes on them and the remaining items that have not participated in the operation. | |
| All | Displays all items that have ever been in the warehouse. | |
| With changes | Shows only the items whose quantity has been changed. For example, Item A has a stock of 10 pcs. If you change the quantity to 20 pcs then the item will be displayed as “With changes”. | |
| No changes | Shows only the items whose quantity has been counted but remained the same as the initial value. For example, Item B has a stock of 10 pcs. If you highlight, edit, delete the quantity but then enter the same as the initial value, it will display as “No changes”. | |
| Untouched | Displays the items not counted/not affected by the revision. Untouched = All – (With changes + Without changes) |
The application of the set filters is started with the Magnifying Glass on the right, and the Hicks clears all filters.
Result (3)
The columns, as well as how the Result works in the revision, vary depending on whether the warehouse you are revising has sub-warehouses. For this reason, the description will be divided into two sub-points.
Result for Warehouse without sub-warehouses (3.1)
Specific to working with the Stock Revision interface without subtables are the checks above the table, which usually include/exclude additional columns. One of them – they work the same way by adding columns – these are Description, Category and Brand.
The others, separated by the text “To Edit”, include/exclude the ability to write directly in the New Quantity and Difference columns. You can include one or both columns, depending on where and what you want to enter:
The Result table (3.1) for a Warehouse without sub-warehouses contains the following data:
Result for Warehouse with sub-warehouses (3.2)
In Warehouse Inventory with sub-warehouses and/or sites, editing of quantities occurs via the icon at the end of each row. The interface that opens shows you the inventory as of date, divided by sub-warehouse/site. This is also the essential difference when working in Inventory with or without sub-warehouses.
The checkboxes above the Description, Category and Brand tables work in the same way as in (3.1) by including/excluding additional columns with more information about the items.

The Result table (3.2) for a Warehouse without sub-warehouses contains the following data:
| Column | Description |
| Code | Article code |
| Name | Item name |
| Opens item file | |
| Batch | Batch |
| Measure | Measure of the item |
| Quantity | Quantity in stock on the selected date |
| Opens a row editing interface by subfolder |
Configuration of how to add rows (4)
Начините за добавяне на артикули и услуги се управляват от Конфигурация на начина за добавяне на редове.
Изгледи на Екран Продукти и Елементи
Двата варианта- Вътрешен и Страничен изглед се сменят чрез поставяне на тикче в желания изглед в Конфигурацията. С тях се работи по един и същ начин.
За да запазите промените, трябва да натиснете бутона Потвърди в Хедъра. Ако искате да излезете без да запазите промените, трябва да натиснете бутона Затвори.
After you click the Confirm button to finalize the Revision, you must fill in the Description and Operation Note in the confirmation interface.