

The interface consists of Header (1), Submit From (2), Submit To (3), Document Data (4), Lines (5), Description and Note (6), and Configure How to Add Lines (7):
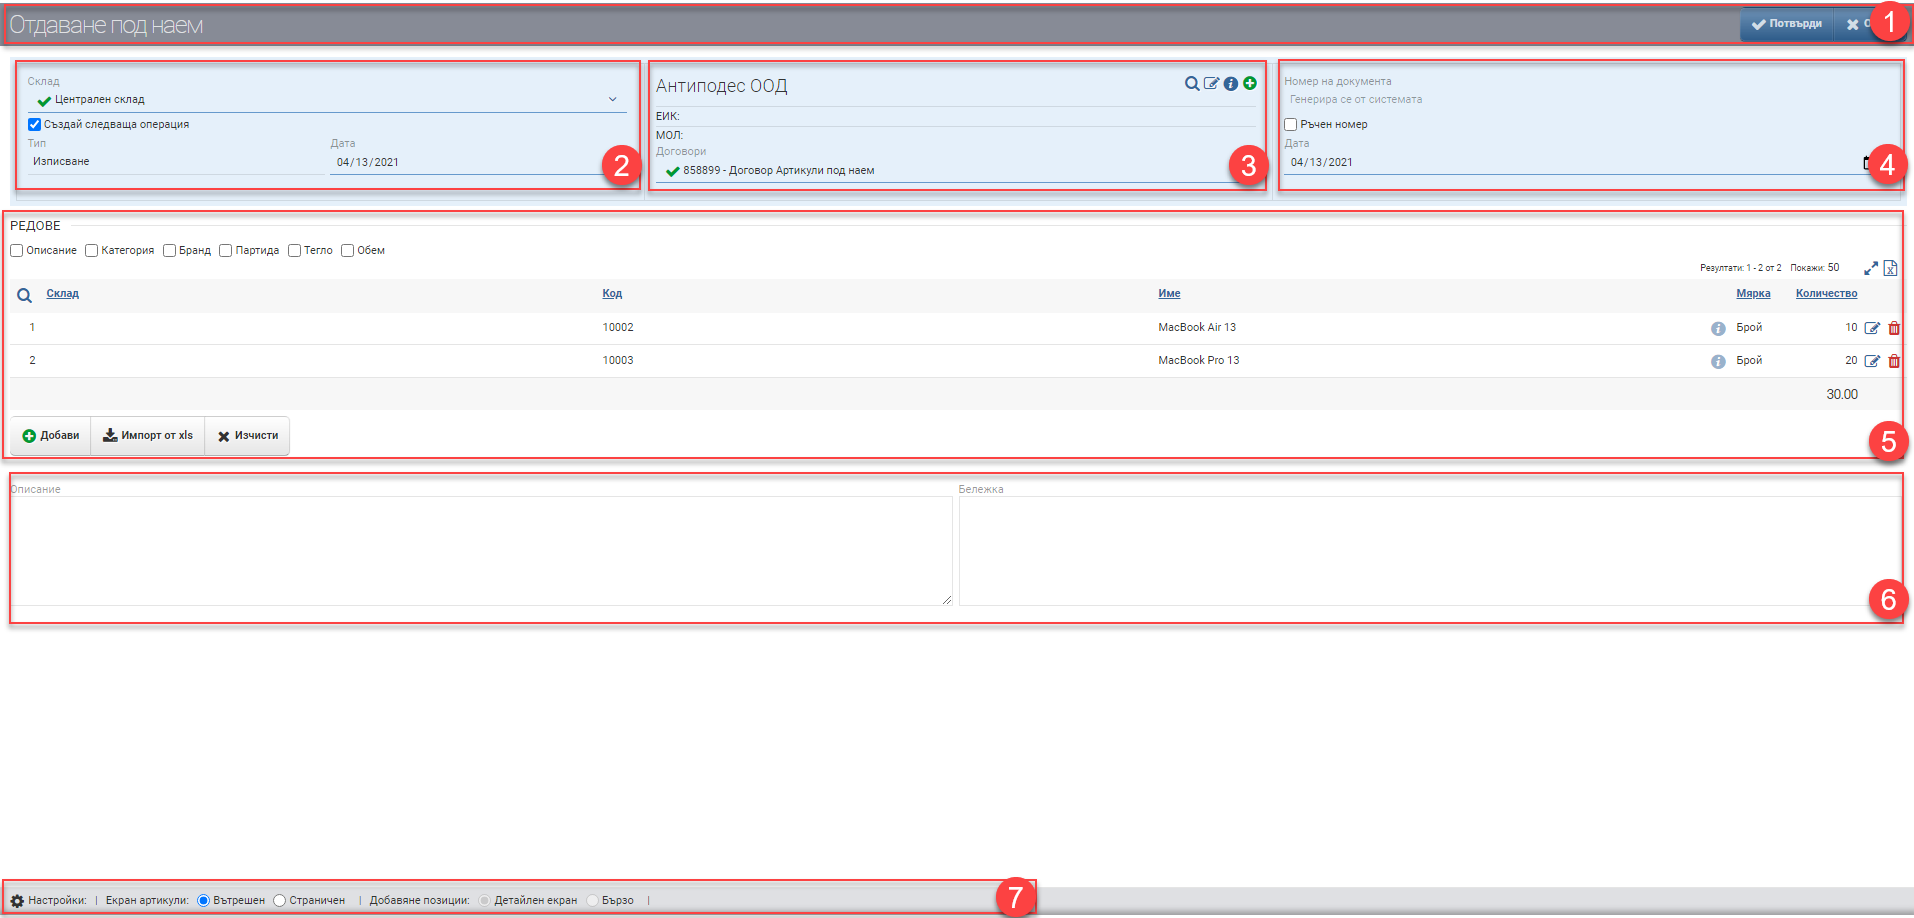
Header (1)
In the Header (1) you see the name of the document you are creating and two buttons to Confirm and Cancel the Lease/Consignment.
Surrender by (2)
In the field Rent from (2) you specify from which warehouse you want the selected items to be rented/consigned.
If you are the MOL of the selected warehouse, you are presented with a “Create Next Operation” option. If you put a check mark on “Create Next Transaction”, by confirming the Rental/Consignment, the system will generate a Check Out that will remove the goods from the warehouse and “hand them over” under the contract to the contractor.
Surrender to (3)
In the Assignment field next to (3), you specify to which counterparty and under which of its contracts you are creating an Assignment.
Document details (4)
| Поле/Чекър | Описание |
| Номер на документа | Номерът на документа се генерира автоматично според зададените правила за номерация. Когато документът е запазен, датата и часът също се запазват. Всички документи, които се генерират автоматично, взимат тези дата и час, освен ако не са променени изрично. |
| Ръчен номер | Слагане на отметка „Ръчен номер“ прави полето за Номер свободно за писане. Потребителят решава с какъв номер ще бъде документа. |
| Дата на документа | Дата на издаване на документа. Зарежда автоматично текуща дата, но може да се промени от потребителя. |
Lines (5)
In section Lines (5) you can manually enter items for Rent/Consign or add them via XLS file.
Manually adding items is done by clicking the button with the corresponding name. You are presented with an interface with all items in the nomenclature. The interface consists of Filter (1) and Result (2):
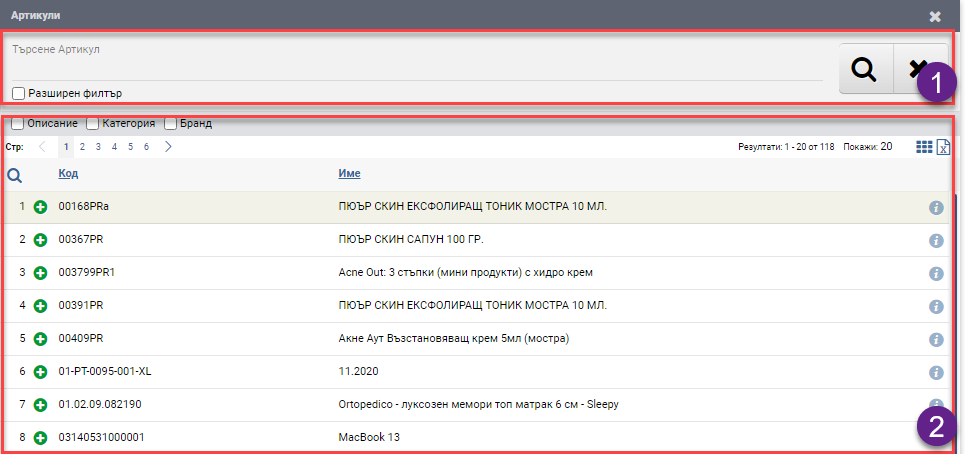
In the free Search box you can search by word, code, brand, etc. to find the item you want. You also have the option to turn on an Advanced Filter with Categories, Brand, Features and Supplier, which can help you find things faster. In addition, you can further filter by available items only. The search is launched with the Magnifying Glass on the left, and the Hicks clears all filters.
The items/services found according to the criteria set by the Filter are ranked in the Result (2). The table consists of the following columns:
| Column | Description |
| Opens the interface to add an item in detail | |
| Code | Article code |
| Name | Item name |
| Opens item file | |
| Free | Shows how many pieces are left free in the warehouse |
The items added from the detail add interface are arranged in Row (5) in a table with the following columns:
| Column | Description |
| Warehouse | Warehouse/sub-warehouse for rent |
| Code | Article code |
| Name | Item name |
| Item file | |
| Measure | Measure of the item |
| Quantity | Quantity to let |
| Opens the line for editing | |
| Deletes row |
In addition to the columns containing basic information, you can include and exclude additional columns of detailed data by means of check boxes :
| Column | Description |
| Description | Item description |
| Category | Category of item |
| Brand | Brand of the item |
| Batch | Batch of item |
| Weight | Displays the weight of the item as set in its file. |
| Volume | Displays the volume of the item as set in its file. |
Description and Note (6)
В полето Описание се попълва в свободен текст описанието на документа. Описанието се визуализира на печатната бланка.
В Бележка може да попълните каквато информация смятате за нужна в свободен текст. Бележката не се визуализира на печатната бланка, а е по-скоро за вътрешно ползване.
Configuration of how to add rows (7)
Начините за добавяне на артикули и услуги се управляват от Конфигурация на начина за добавяне на редове.
Изгледи на Екран Продукти и Елементи
Двата варианта- Вътрешен и Страничен изглед се сменят чрез поставяне на тикче в желания изглед в Конфигурацията. С тях се работи по един и същ начин.
За да запазите промените, трябва да натиснете бутона Потвърди в Хедъра. Ако искате да излезете без да запазите промените, трябва да натиснете бутона Затвори.