

Interface for creating a sale. The screen is divided into several parts: Header (1), Contractor (2), Company Data (3), Transmission Method (4), Financial Document (5), Payment (6), Document Data (7), Lines (8), Total (9), Description and Note (10) and Configuration of the way to add lines (11).
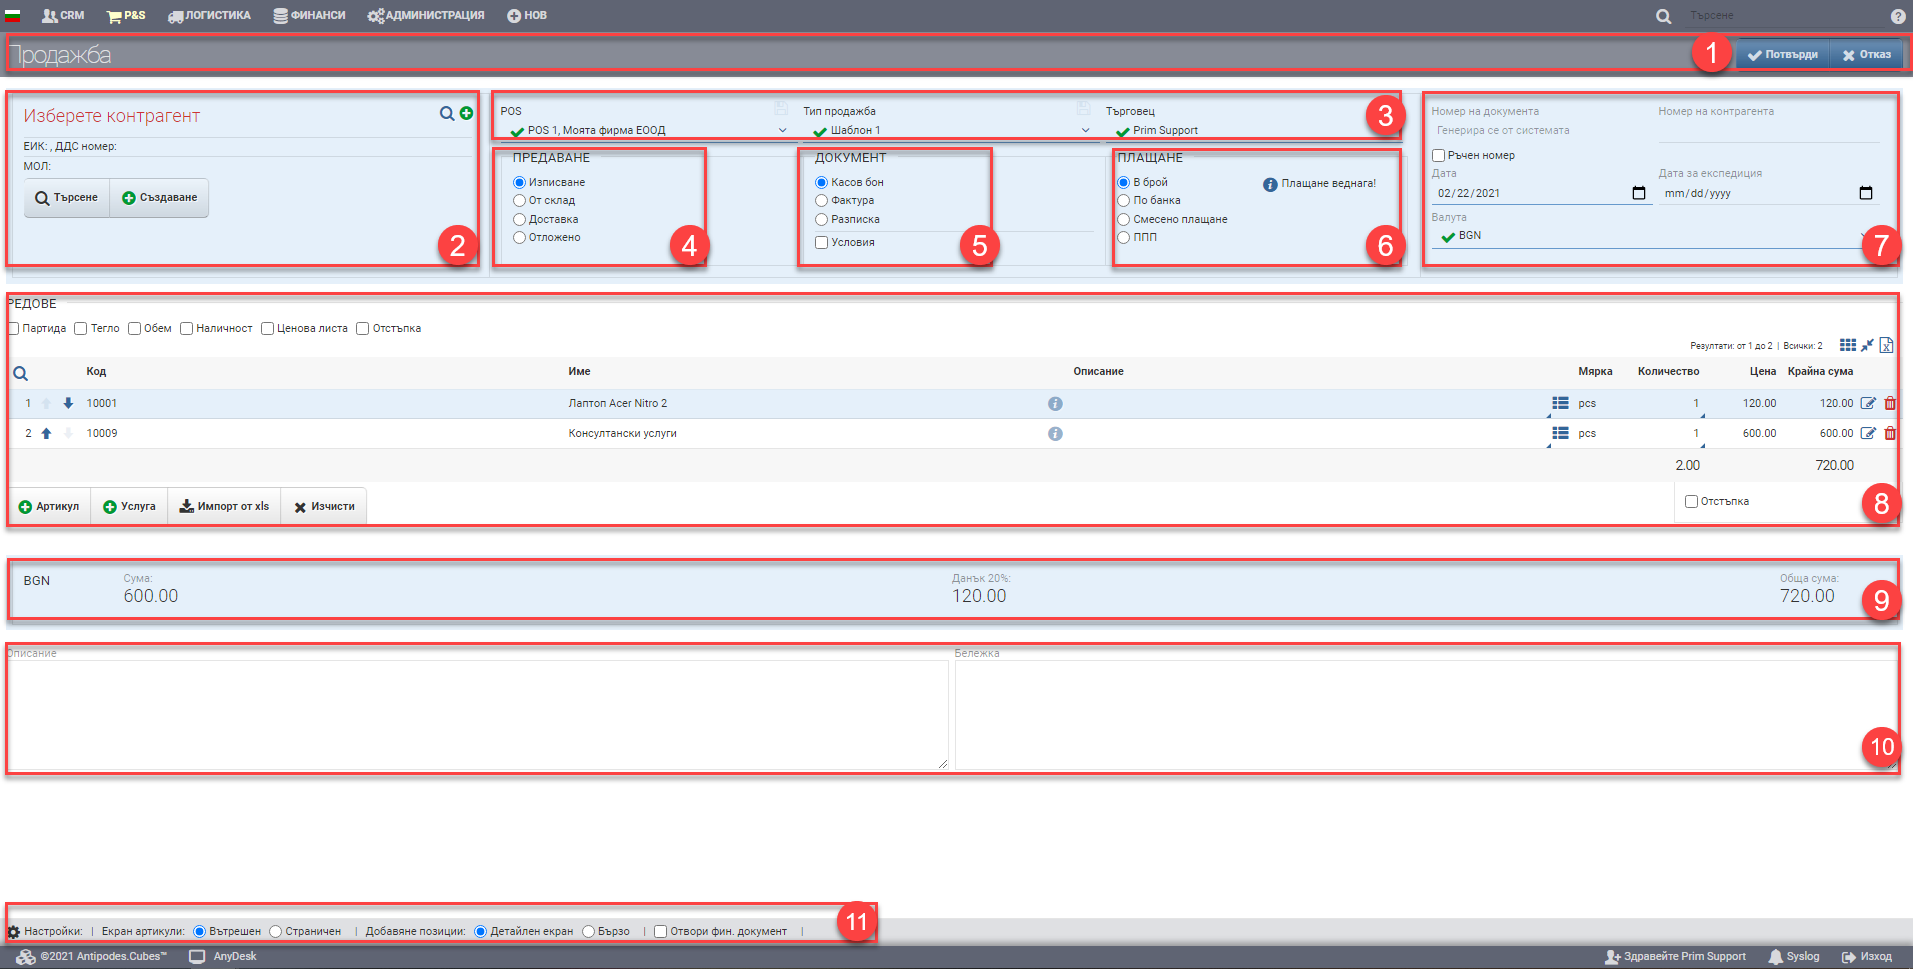
Header (1)
In the Header (1) you see the name of the document you are creating and two buttons for Confirm and Cancel.
Contractor (2)
In the Counterparty section (2) you can select an existing counterparty (Search) or add a new one (Create). You can also view and edit the contractor’s file.
Company data (3)
In Company Details (3) you need to select the POS you are selling from, Type of Sale and Merchant of Sale.
All the options of Transmission Method (4), Financial Document (5), Payment (6) depend on the setting of Sale Type you have selected.
Mode of transmission (4)
In the Transmission section (4) you select the method of transmission of the goods. The possible ways are:
| Option | Description |
| Direct to | The handover of the goods is immediate – the customer takes the goods and they leave the warehouse. A Discharge operation is generated. |
| From stock | Used in case the customer goes to the warehouse to pick up the goods. When you select this option, an additional Block box will appear, which allows you to select which warehouse the item should be blocked in so that it cannot be checked out by other users. Generate an intermediate Expedition operation, which you must subsequently complete with a Discharge operation when the goods are finally taken from the warehouse. Important! Dispatch does not reduce stock. Only the Checkout “gets” the goods out of the warehouse! |
| Delivery | The goods will be delivered to the customer. If you select this option, three additional fields will appear: – method of delivery ( choose courier, own transport, customer’s transport) – delivery address in the Contractor field (2), where you need to specify to which address of the customer the goods will be delivered. – Blocking. You need to choose where the goods will be discharged from, as well as where they will be blocked until you get them out of the warehouse. Once you confirm a sale with a delivery transmission type, it will be ordered for Completion in the Logistics -> Shipping -> Completion menu where it should be processed. |
| Suspended | The handover of the goods will be delayed. No operation is generated- neither dispatch nor discharge. |
Financial document (5)
In the Document section (5), select the financial document of the sale. Choose between:
- Cash voucher
- Invoice
- Receipt
Additionally, you have the option terms of the financial document:
- Tax transaction – you can select a different tax transaction than the default one.
- Payment term- an optional field for the payment term of the financial document appears if you have selected any type of deferred payment in Payment (6).
Payment (6)
In Payment (6) you must select the payment method of the sale. The options are:
| Option | Description |
| In cash | Payment in cash immediately generates a COD in the cash register tied to the POS. Whenever you select cash payment, an exclamation mark appears in the payment field with the text ‘Pay Now’. This means that with the confirmation of the sale, both the selected financial document and the PCR will be generated. |
| By bank | Payment will be made by bank transfer. If you select this payment type, neither the selected financial document nor a payment document will be generated immediately. |
| Payment on delivery | Used when sending items by courier, in which case you are required to issue a receipt from the cash register regardless of the financial document selected. |
| POS payment/ by card | Generates a Bank Credit in the account selected for card payments. |
| Mixed payment | It will generate a CCP and Bank Credit to the account selected for card payments. |
| WFP | Used when sending items by licensed courier, in which case you are not required to issue a receipt from the cash register, regardless of the financial document selected. |
| Other types of payments | Depending on the specifics of the system, other payment methods can be created. |
Important! A key principle in the system is the relationship between the individual documents:
- The sale is in direct relation to the dispatch/discharge and the financial document
- The financial document is directly linked to the payment.
You can’t just generate payment from the sale! In order to generate a payment, it will be generated and fin. Document. That is- if you have set a cash payment in Payment (6) and a financial document invoice, then an invoice will be generated for you and the sales receipt will be attached to it when the sale is confirmed.
Document details (7)
Document data (7) includes the following parameters:
| Field/Checker | Description |
| Document number | The document number is automatically generated according to the set numbering rules. When a sale is saved, the date and time are also saved, and all documents that are automatically generated take those date and time. |
| Manual number | Checking “Manual Number” makes the Number field free for typing. The user decides what number the document will be. |
| Counterparty number | Number of the sale for the customer. It is used in case you already know what number the client will use to reflect the document in his system. |
| Date of document | Date of issue of the document. Automatically loads current date, but can be changed by the user. |
| Date for dispatch | Estimated completion date of the sale, which is visible in Completion. The date is used only as a guide for sales ordered for execution and serves no other than informational functions. |
| Currency | The currency of the document is selected from the list of currencies already entered. |
| Exchange rate | Exchange rate value for the day according to BNB. Can be changed manually by double clicking in the field. |
Lines (8)
In the Lines section (8) you can manually enter items and services or add items/services via an XLS file.
Adding an item and/or service is done by clicking the button with the corresponding name. Initially you are loaded with an interface with all items/services from the inventory, and you can set it to display only the available items. The interface consists of Filter (1) and Result (2):
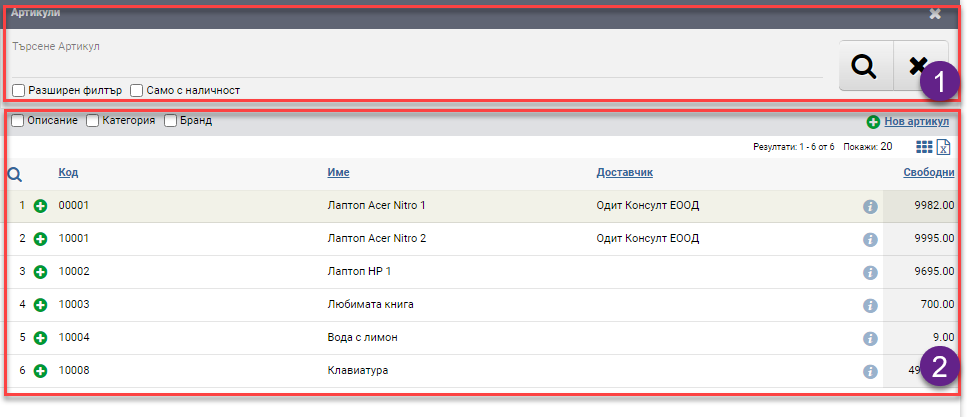
In the free Search box you can search by word, code, brand, etc. to find the item or service you want. You also have the option to include an Advanced Filter with Categories, Brand, Features and Supplier, which can help you find the item/service faster. In addition, you can further filter by available items only. The search is launched with the Magnifying Glass on the left, and the Hicks clears all filters.
The items/services found according to the criteria set by the Filter are ranked in the Result (2). The table consists of the following columns:
| Column | Description |
| + button | Adds the item/service to the sales line ( when adding items quickly) or opens the interface to add the item/service in detail. |
| Code | Item/service code |
| Name | Name of item/service |
| Info button | Opens item/service file |
| Free | How many pieces are left free in the warehouse adjacent to the POS. |
| Minimum price | Optional when setting the Sale Type |
| Final price | Price list Final price |
Note that the view of this screen largely depends on the setting of the Type of Sale that is used, so the columns and options may vary. The same applies to the Price List columns such as Final Price.
The added items and/or services are arranged in Row (8) in a table with the following columns:
| Column | Description |
| Code | Article code |
| Name | Item name |
| Description | Description of the article |
| Measure | Measure of the item |
| Quantity | Availability of item |
| Price | Item price without taxes |
| Final amount | Amount with taxes |
You can also include additional columns above the rows:
| Column | Description |
| Batch | Indicates if the item is in a batch. When you have selected the type of transmission Direct and the item has a batch number, the system will require this number. |
| Weight | Displays the weight of the item as set in its file. |
| Volume | Displays the volume of the item as set in its file. |
| Availability | Displays the availability of the item in the warehouse tied to the POS. |
| Price list | Price list used for the sale |
| Discount | Displays the % discount by line and/or discount by document. When both discounts are applied, their percentage is automatically calculated. |
| Final price | Shows final amount with taxes. |
| Taxes | Shows the taxes of the order |
The system calculates the total of all lines. But note the following:
The system takes the final price in the sale, multiplies it by the rate, rounds to the second digit, and then divides by the quantity to calculate the unit price. So the final price is correct relative to the exchange rate, but the unit price may vary. It is not the unit price that is leading because differences in the final price would result.
Total (9)
The Total section (9) gives you information about all the totals of the sale you are creating in the following fields:
| Field | Description |
| Currency | Currency of sale |
| Sum | Tax basis of sale |
| Tax | Value of the tax, and % |
| Total amount | Final sale amount = tax base + taxes |
In case you have lines with different tax rates in the sale, separate fields for each different VAT value as well as the % VAT will be displayed in Total (9).
Basis and Note (10)
In the field Reason (10) the reason for the transaction is filled in free text. The reason is displayed on the printed form of the sale.
You may fill in Note (10 ) with whatever information you feel is necessary in free text. The note is not displayed on the printed form, but is rather for internal use.
Configuration of how to add rows (11)
The ways to add items and services are managed by the Row Add Method Configuration (11).
Views of Screen Items
The two options- Inner and Side view are changed by placing a tick in the desired view in Configuration (11). They are handled in the same way.
A way to add positions
Adding items can also be changed, unlike Views, here the change is functional. The main difference between Detail Screen and Quick is the poisoning of the pop-up to add item detail service. In Detail, there is a pop-up, and in Quick, your lines are added automatically after you press the green plus in the item/services list. See the difference in the following video:
The last function of Configuration of how to add rows (11) is Open Financial Document.
If you check this option, then after the sale is generated, if there is also an automatically generated financial document, then its file will load on your screen.
To save your changes, you need to click the Confirm button. If you want to exit without saving your changes, you need to click the Close button.