

The interface consists of Header (1), From Stock (2), To Stock (3), Document Data (4), Products (5), Materials (6), Description and Note (7) and Configuration of how to add rows (8).
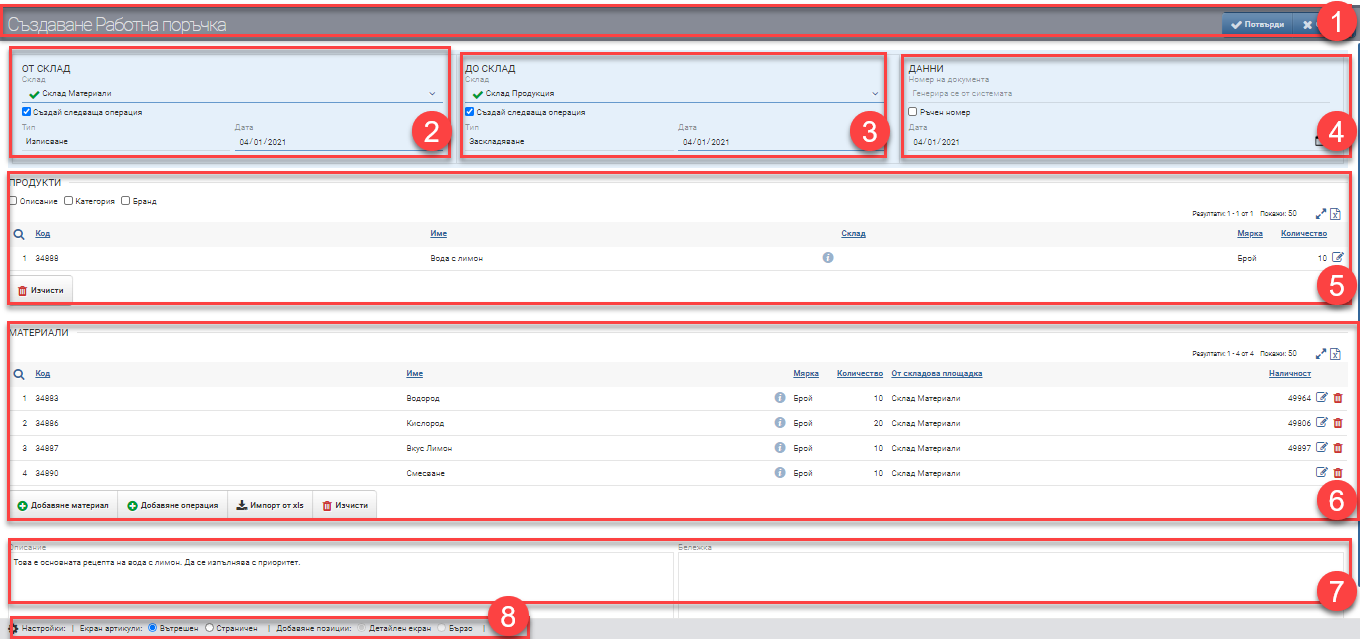
Header (1)
In the Header (1) you see two buttons for Confirm and Cancel the Work Order.
From stock (2)
In the From warehouse (2) field, you specify from which warehouse the items to be used (materials, items) in the finished product (product) from the Work order will come.
If you are the MOL of the warehouse, you will see a “Create next operation” checkbox under the warehouse selection box. When you place a check in the field, the system will prepare a “Checkout” operation that will be generated when you confirm the work order. The listing will pull the items from the warehouse you selected in the top field.
You can also choose which date to create the next transaction with, as the default is today’s date.
Next to warehouse (3)
In the To warehouse (3) field, you specify which warehouse the already manufactured products from the work order will enter.
If you are the MOL of the warehouse, you will see a “Create next operation” checkbox under the warehouse selection box. When you place a check in the field, the system will prepare a “Checkout” operation that will be generated when you confirm the work order. Locking will put the items into the warehouse you selected in the top box.
You can also choose which date to create the next transaction with, as the default is today’s date.
Document details (4)
Document data (4) includes the following parameters:
| Field/Checker | Description |
| Document number | The document number is automatically generated according to the set numbering rules. When the Work Order is booked, the date and time are also saved. |
| Manual number | Checking “Manual Number” makes the Number field free for typing. The user decides what number the document will be. |
| Date of document | Date of issue of the document. Automatically loads current date, but can be changed by the user. |
Products (5)
Important!
You can produce an unlimited quantity of one product in one work order.
In the Select Products section, you must specify which product you will manufacture with the Work Order from the list of all products in the product list. The interface for adding products consists of Filter (1) and Result (2):
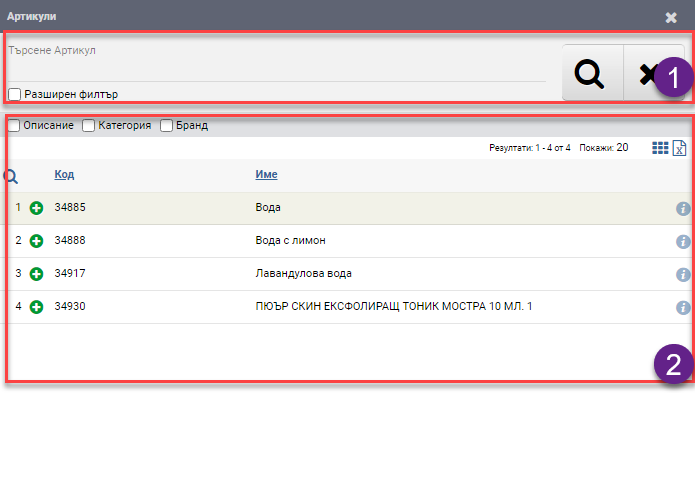
In the free Search box you can search by word, code, brand, etc. to find the product you want. You also have the option to turn on an Advanced Filter with Categories, Brand, Features and Supplier, which can help you find things faster. The search is launched with the Magnifying Glass on the left, and the Hicks clears all filters.
The products found according to the criteria set by the Filter are ranked in the Result (2). The table consists of the following columns:
| Column | Description |
| Opens the Add Product Detail interface, where you specify how much and which recipe you will produce | |
| Code | Product code |
| Name | Product name |
| Opens product file |
Once you have chosen what, how much, which recipe you will produce and added the product, it is arranged in a table with the following columns:
| Column | Description |
| Code | Product code |
| Name | Product name |
| Opens product file | |
| Warehouse | Warehouse/storage site where the material will be stored. |
| Measure | Product measure |
| Quantity | Product quantity entered |
| Opens the edit line and returns you to the recipe selection interface |
In addition to the columns containing basic information, you can include and exclude the following additional columns of detailed data by checking the Products table(5):
| Column | Description |
| Description | Product Description |
| Category | Product Category |
| Brand | Brand of the product |
Below your product table appears the Clear button. It removes the selected product and re-activates the Select Products button from where to select the product again.
Once the product is added, its recipe ingredients appear in Materials (6).
Materials (6)
The Materials section (6) contains a list of all ingredients of the selected product recipe, as well as buttons for several additional options to modify and complete the recipe.
The Materials table contains the following columns:
| Column | Description |
| Code | Item code |
| Name | Item name |
| Opens item file | |
| Measure | Measure of the element inputs |
| Quantity | Amount of the item inputs |
| Availability | Stock in the warehouse from which the materials are coming out selected in the Warehouse section of (2) |
| Opens an interface for editing the quantity and measure of the item | |
| Deletes row |
The buttons below the table also allow you to add additional items (operations, materials, products and items) to the production that are not included in the recipe in general. You also have the option of making a material substitution at the work order level, by deleting a material that is normally set in the recipe and selecting another in its place from the nomenclature.
| Button | Description |
| Add material | Opens interface for adding material |
| Add operation | Opens an interface for adding an operation |
| Import from xls | Opens interface for importing materials from XLS |
| Clear | Deletes all rows in the Materials table (6) |
Description and Note (7)
In the Description field (7), the description of the work order is filled in free text. The description is displayed on the printed form.
You may fill in Note (7) with whatever information you feel is necessary in free text. The note is not displayed on the printed form, but is rather for internal use.
Configure how to add rows (8)
The ways to add items and services are managed by the Add Row Method Configuration (9).
Views of Products and Items screen
The two options- Inside and Side view are changed by placing a tick in the desired view in Configuration (9). They are handled in the same way.
To save your changes and create the Work Order, you must click the Confirm button in the Header (1). If you want to exit without saving your changes, you need to press the Close button in the Header (1).