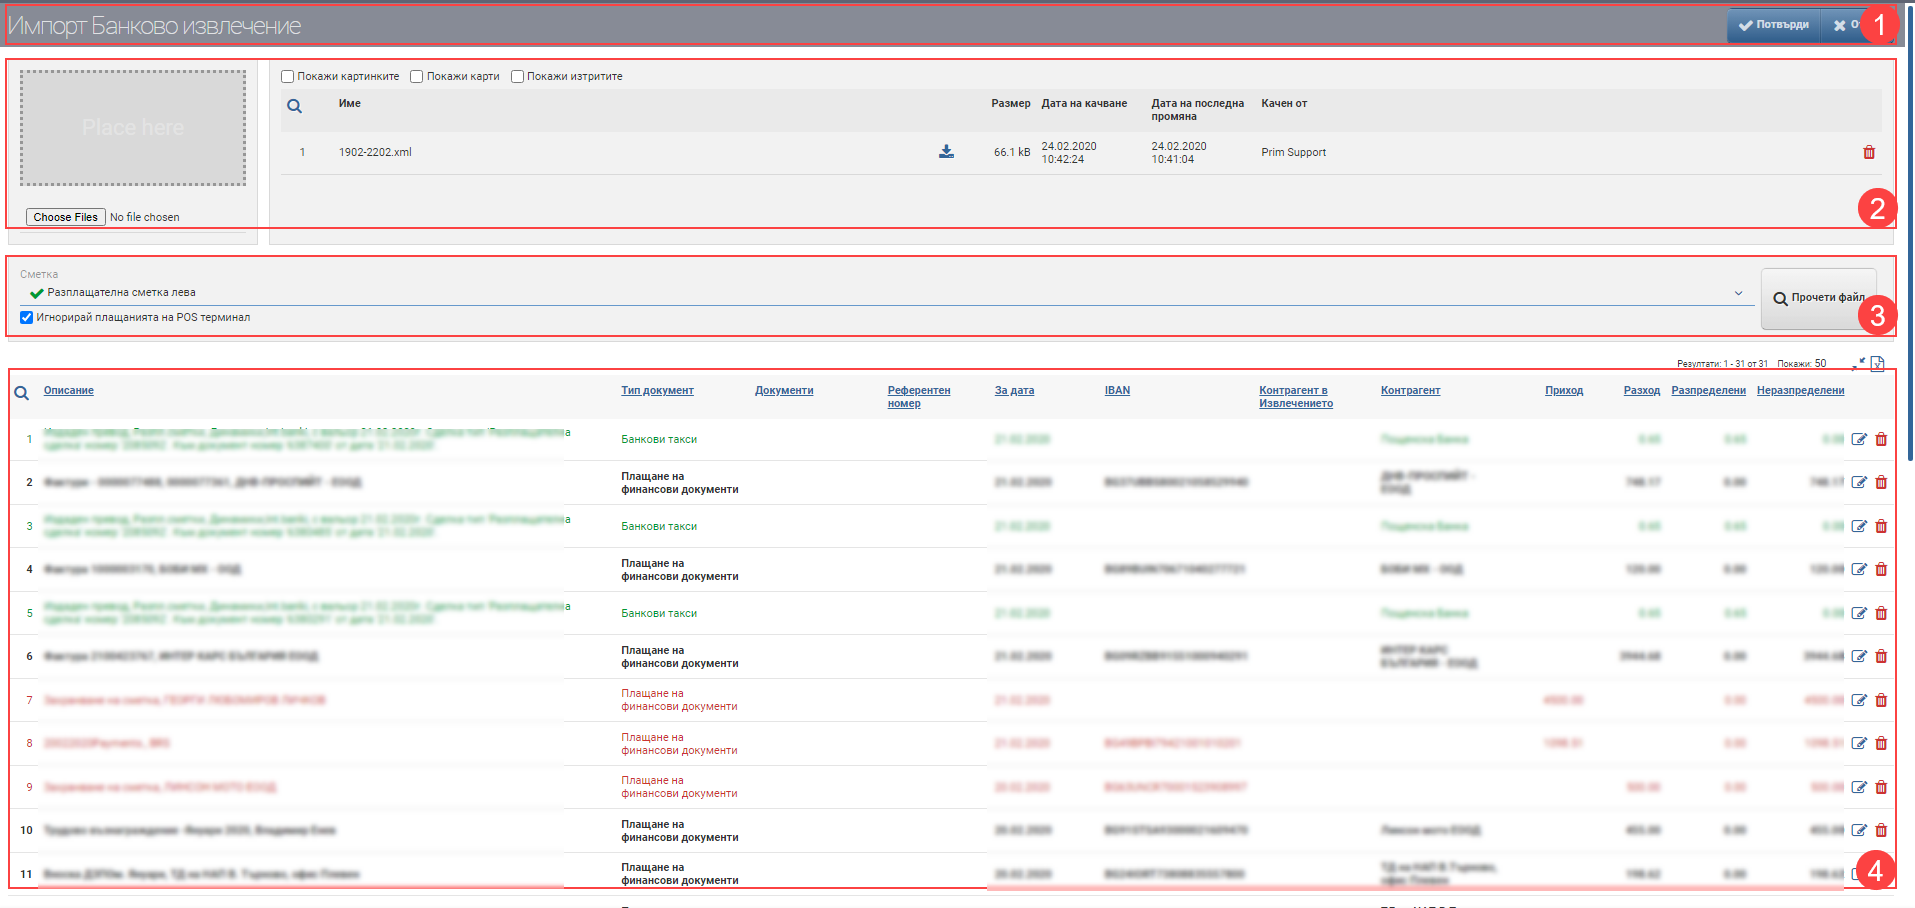
Interface for importing bank statements. It consists of: Header (1), File Manager (2), Account (3) and Statement Lines (4):

Header (1)
In the Header you see the interface name and a button to cancel and confirm the import.
File Manager (2)
You upload the file you want to import from your device using the Choose files button or by dragging and dropping. You can read more about working with attachments here.
Account (3)
In the Account field (3), select a bank account to which you will import. You will see a list of bank accounts for which you have rights.
Under the account selection there is a checkbox “Ignore POS payments”. It is used in case you are using a Virtual Account for these payments and do not want them to be duplicated in the selected import account. When a checker is inserted, any bank statement lines that have an ATM/POS counterparty will be ignored and will not line up in Statement Lines (4). They will not be imported with confirmation of the operation.
After selecting the account and whether to ignore the POS payments, you must click the Read File button to have your Statement Lines (4) load.
Important!
It is normal for a larger number of rows to take longer to import.
Extract lines (4)
All lines of the imported file are ordered in Extract lines (4). The table contains the following columns and the following actions are performed on it:
Important features when processing bank statement import lines:
When a counterparty and a document are recognised, and when the amount is fully allocated, the line of the bank statement is coloured green.
When only the counterparty is recognized, but not the financial documents, the line is shaded black. The same happens with a balance as an undistributed payment. The order will be imported without further processing, but the remainder of the amount will remain unallocated.
In cases where neither the counterparty nor the document is identified, the line is coloured red. The line needs further processing.
When a line imported from Move Money is recognized, that is, when the IBAN of the payee in the statement matches the IBAN entered to one of the company accounts, the line is grayed out. The order will be ignored.
If there is no IBAN or the IBAN of the account you are importing matches, the system recognizes the line as a bank charge.
You cannot confirm import with red lines!
A brief step-by-step description of the procedure for importing bank statements:
- Download a file from the bank in the appropriate format. You can see which banks with which files are imported from here.
- Go to Finance > Finance > Import bank statements
- Start New Import Bank Statement from the button in the Header (1).
- Upload the file to the File Manager (2).
- Select the bank account where you want to import the file and click the Read File button in Account (3).
- Process the rows and confirm the import with the Confirm button in the Header (1). If you do not want to confirm it and have the changes reflected, you can use the Cancel button in the Header (1).
How does the system recognize bank statement lines?
- Verifies that the IBAN of the line matches the IBAN entered in the counterparty. If there is a match, start looking through the counterparty’s financial documents and match them to the line description on the bank statement.
- If there is no match under item 1, check by counterparty name.
- If there is no match under item 2, check the line description on the statement.
- If there is no match on one of the above points, the line remains red. It needs further processing.
Important!
When manually associating a line with a counterparty by editing, the IBAN will be saved to the counterparty and will be recognized automatically on the next import.
Important!
Once a bank statement import is confirmed, it cannot be deleted completely!
If you have an error in any of the lines, the only thing you can do is delete, cancel or edit only the Bank Debit/Bank Credit, i.e. only a line of it!
The procedure is as follows:
1. Log in to your bank account.
2. Find the Bank Debit/Credit you want to edit.
3. Open the Bank Debit/Credit file and make changes by editing/deleting/cancelling.
4. You can then re-enter it if it has been deleted or cancelled.