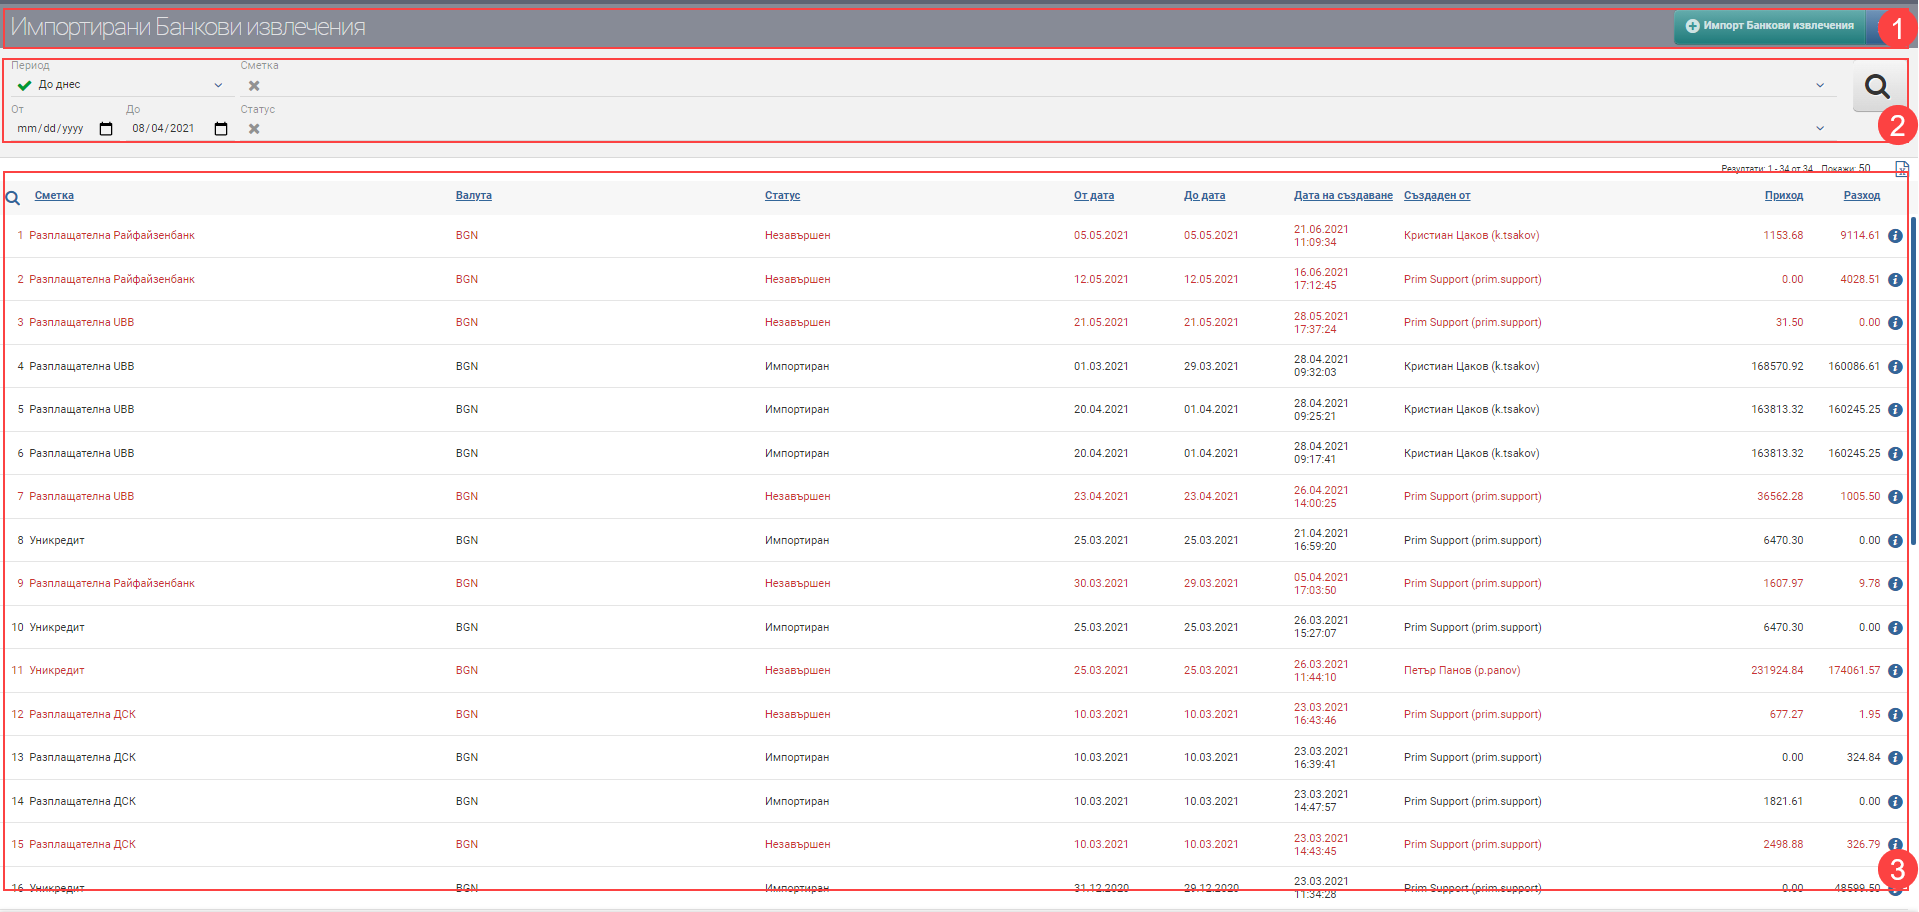
The interface with the bank statements released for import and already completed consists of Header (1), Filter (2) and Result (3) :

Header (1)
In the Header (1) you see a button to create a New Import Bank Statement , and a button to set the financial category for bank charges, where you specify which category the bank charges should go in the statements.
Filter (2)
In order to process your bank statements faster, track their status and development, the system provides you with different ways to filter the information that often comes from multiple accounts. The search is started with the Magnifying Glass, and the Hicks clears all filters. In the table below you will see all the filters and their explanations:
| Filter | Description | Further description of the options |
| Period | Choose from a drop-down menu for which period to display your statements. | The possible options are: – Today – Yesterday – The last 7 days – Last 30 days – The last 365 days – Current month – Previous month – Current quarter – Previous quarter – Current year – Previous year – Until today |
| From date – To date | You select specific dates as the period for which to display your statements. | |
| Account | Filter by the account where the statements are entered. | Select the bank account where the statement was entered. You are only shown accounts on which you are the MOL. |
| Status | Filter by Bank Statement Status, which can be Imported and Incomplete. | |
| Imported | The bank statement is confirmed. Imported documents are coloured black. | |
| Unfinished | The bank statement is active, it is still subject to processing. Incomplete documents are coloured red. |
Important:
In order to be shown an account’s bank statements, you must be its MOL!
Result (3)
You will see the extracts found according to the criteria set in Filter (2) in Result (3). In the table you will see a list containing the following columns of information:
Colours by status
In addition to the information the system gives you about the statements through the columns in the Table, another way to easily identify their status is included- this is the visual coloring. It varies according to the stage at which the import is:
| Colour of the financial document | Description |
| Red | The import of the bank statement has not yet been confirmed by the user. |
| Black | The import of the bank statement has been confirmed. |
File format according to the bank with which the bank statement is imported into the system:
| Bank | File type | Features |
| Allianz | XLS | |
| Expressbank | MT940 | |
| DSK | MT940 | |
| UBB | XML and TXT | The TXT file must be separated by “|” . In order to process the file correctly, the “Detailed Extract” checkbox must be clicked. If unchecked, the system will read the lines as bank charges. |
| ProCredit | XLS | |
| Raiffeisenbank | MT940 | |
| Unicredit Bulbank | XML | |
| FIBank | MT940 | |
| PostBank | XML |
Important !
When withdrawing from the bank and you have more than one account, always choose a specific account!
Once a bank statement import is confirmed, it cannot be deleted completely!
If you have an error in any of the lines, the only thing you can do is delete, cancel or edit only the Bank Debit/Bank Credit, i.e. only a line of it!
The procedure is as follows:
1. Log in to your bank account.
2. Find the Bank Debit/Credit you want to edit.
3. Open the Bank Debit/Credit file and make changes by editing/deleting/cancelling.
4. You can then re-enter it if it has been deleted or cancelled.