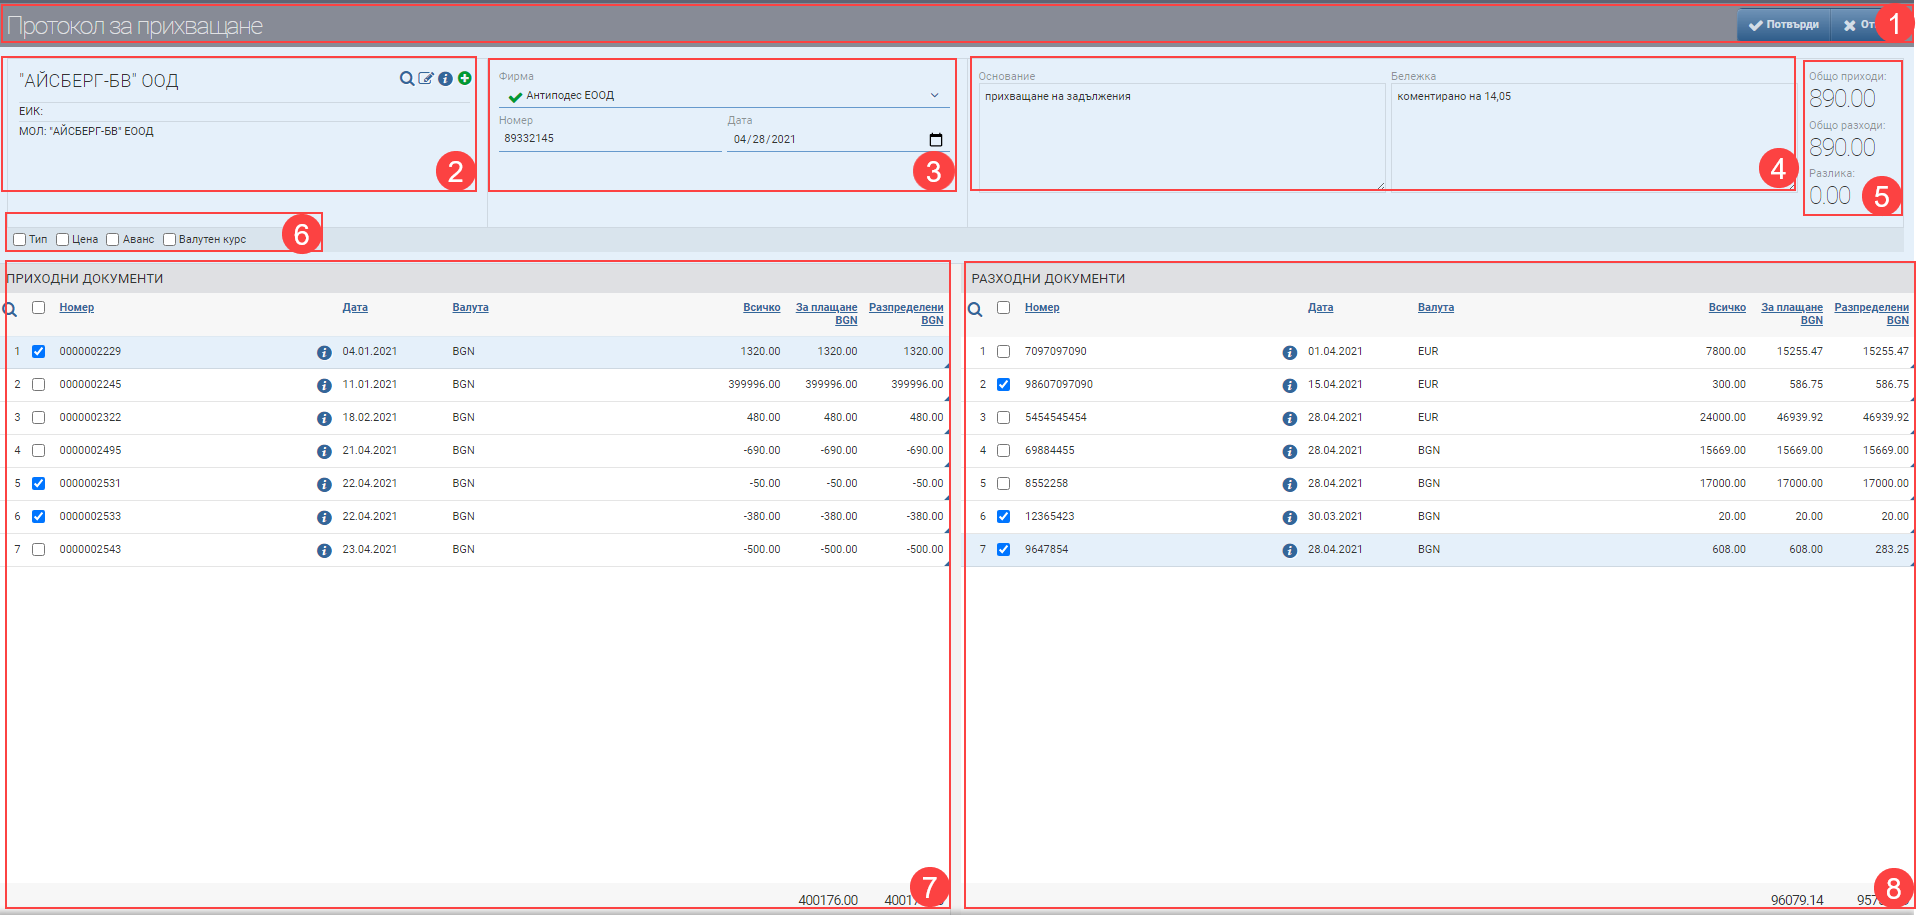
Interface for issuing interception protocols. Consists of Header (1), Counterparty (2), Document Details (3), Justification and Note (4), Offset Amounts (5), Additional Checks (6), Receipts (7), and Expenses (8):

Header (1)
In the Header (1), you see the name of the document you are creating and two buttons to Confirm and Cancel the Interception Protocol.
Contractor (2)
In the Contractor section (2) you can select an existing contractor, edit it and access its file.
Important! The contractor must be a Customer Type and a Supplier Type, and financial documents (revenue/expenditure) must be registered to both. Payments must not have been entered on the financial documents or the payments must not cover their full amount in order to be offset.
Document details (3)
In Document Details (3) you must select the own company from where the Revenue documents are issued and where the Expense documents are registered.
You must enter a Document Number in the field that is free to type, and select a Document Date. By default, the current date is loaded, but can be changed by the user.
Base and Note (4)
In the field Reason (4) the reason for the transaction is filled in free text. The justification is displayed on the printed form of the document.
In Note (4) you can fill in whatever information you think is necessary in free text. The note is not displayed on the printed form, but is rather for internal use.
Offset amounts (5)
The Offset Amounts (5) fields show you the sum of the amounts in the Allocated to marked receipts and disbursements fields.
| Field | Description |
| Total revenue | The sum of all amounts in the column Allocated of the marked Revenue documents (7) |
| Total expenditure | The sum of all amounts in the Allocated column of the marked Expenditure documents (8) |
| The Difference | The difference between the amounts on the Receipts and the Expenses. The difference should always be 0.00!!! If the difference is greater, the system will not allow you to save the Protocol. |
Important!
The most important thing in creating an Offset Protocol is that the amount of the selected receipts is EQUAL to the amounts of the selected expense receipts! The system will not allow you to save the Protocol (the Confirm button in the Header (1) will not be active) if the amounts are not exactly the same.
Additional checkers (6)
In addition to the columns containing basic information, you can also include and exclude the following additional columns of detailed data to the rows of the Revenue (7) and Expenditure (8) documents using check boxes:
| Column | Description |
| Type | Type of financial document. |
| Price | Adds Total and Taxes columns. |
| Advance | Indicates whether the selected line is an advance financial document. |
| Exchange rate | Displays the exchange rate at which the financial document was entered. |
Revenue documents (7)
On the left-hand side of the interface you see all partially or fully unpaid Receipts (7) of the counterparty you have selected. The Revenue Documents table contains the following data:
| Column/Checker | Description |
| Marking field | You indicate by ticking which revenue document you want to include in the Offset Protocol. |
| Number | Financial document number |
| Info button | Opens a file of the financial document |
| Date | Date of the financial document |
| Currency | Currency of the financial document |
| All | The total amount of the financial document |
| For payment | What amount is left to pay on the financial document. |
| Distributed | In this field, you indicate how much of the payment amount you want to allocate to the Protocol. Once the line is selected by the checkbox, this field becomes free to write. Initially you are charged the full amount left to pay, but this can be changed. |
Expenditure documents (8)
On the right side of the interface you see all partially or fully unpaid Expense documents ( 8) of the counterparty you have selected. The table of Cost documents contains the following data:
| Column/Checker | Description |
| Marking field | You indicate by ticking which expense document you want to include in the Offset Protocol. |
| Number | Financial document number |
| Info button | Financial document file |
| Date | Date of the financial document |
| Currency | Currency of the financial document |
| All | The total amount of the financial document including taxes |
| For payment | What amount is left to pay on the financial document. |
| Distributed | In this field, you indicate how much of the payment amount you want to allocate to the Protocol. Once the line is selected by the checkbox, this field becomes free to write. Initially you are charged the full amount left to pay, but this can be changed. |
Marking the desired documents for the Performance Report includes the amounts entered as Allocated on their line items and automatically adds them to Offset Amounts (5).
To save your changes and create the Interception Protocol, you must click the Confirm button in the Header (1) . If you want to exit without saving your changes, you must click the Cancel button in the Header (1).