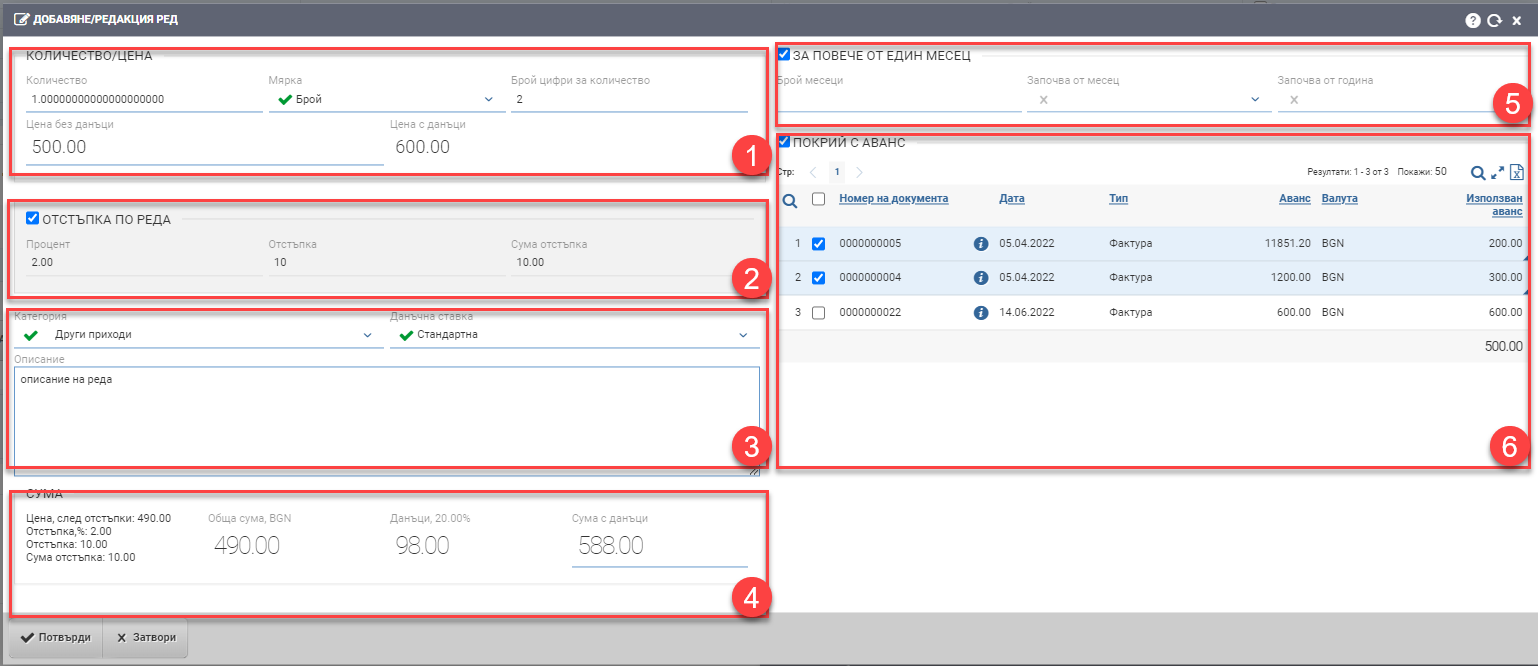
Interface for adding/editing a line from an invoice. The screen is divided into several parts: line details (1), line discount (2), financial details (3), line amount (4), pay for more than a month (5) and cover with advance (6):

Order details (1)
In the Order Details section (1) you must fill in the quantity and amount in the following fields:
| Field | Description |
| Quantity | What quantity do you add |
| Measure | In what measure is the quantity |
| Number of figures for quantity | How many digits for the quantity will be displayed after the decimal point |
| Price without taxes | Unit price without taxes |
| Price with taxes | Unit price with taxes |
Note that adding an item to a financial document that is not related to a sale/order will not tie the item to the warehouse in any way. That is, even if you invoice 100 units of item X, there is no way they will come out of the warehouse, get ordered out, get blocked, etc. This is all done through warehouse operations related to the sale/order!
You can read more about the links between the different operations – trading, warehousing, financial and payment – here.
Line Discount (2)
You will also see the Discount by Order checkbox if you have permissions to work with discounts. Once you have inserted the check, you will be presented with three fields, and you can type in each of them, depending on what type of discount you are entering:
| Field | Description |
| Percentage | Discount percentage. The system will automatically calculate the remaining two fields, depending on the price entered in Order Data (1). The maximum field value is 100. |
| Discount | Discount based on unit price. The system will automatically calculate the remaining two fields, depending on the price entered in Order Data (1). The maximum value of the field is the unit price excluding taxes. |
| Discount amount | Amount discounted base total price (unit price*quantity) excluding taxes. The system will automatically calculate the remaining two fields, depending on the price entered in Order Data (1). The maximum value of the field is the total price excluding taxes. |
Financial data (3)
| Field | Description |
| Category | Select a financial category from the list of categories. |
| Tax rate | You choose the tax rate of the line you are entering. According to the rate, the value of VAT is determined and it is charged automatically in the row amount fields (4). |
| Description | The name of the selected financial category is carried over by default, but the field is free-write and you can change it. |
Sum of row (4)
The system automatically calculates the entered data for quantity, prices, taxes and discounts into a sum of Order Sum (4) and shows you the following data:
| Field | Description |
| Price, after discounts: | |
| Discount,%: | |
| Discount: | |
| Sum discount: | |
| Total amount, BGN | Total amount excluding taxes (quantity*unit price excluding taxes) |
| Taxes, 20.00% | Amount of the tax and its value in percentage according to the set tax rate. |
| Amount with taxes | Final sum (unit price with taxes* quantity). The field is free to write in and you can write directly in it if you know the final amount. The system will transfer the data on the other fields. |
Payment for more than one month (5)
Putting a check in Pay for more than one month will spread the entered amount over a certain number of months. This saves entering multiple lines when you need to issue or receive an invoice for pediotic services, for example.
| Field | Description |
| Number of months | For how many months you will enter – the system will genereate as many lines in the financial document as months you enter in the field. |
| Starting in a month | From which month to start counting. |
| Starts from year | From which year to start counting. |
Cover with advance (6)
The field allows you to cover part or all of the financial document line with an advance. You are shown all unused financial documents marked as advance and by placing a check mark on the line you add it to the document you are creating. If you do not wish to use the entire advance from the document, you can change the amount in the Advance Used column.
To add the line to the financial document, you must click the Confirm button. If you want to exit without saving your changes, you need to click the Close button.