

Once you have added a new integration system, you need to set up its marts from P&S > Settings > Integration Systems.
For example: you add an Amazon integration system. Its marketplaces can be Amazon DE, Amazon FR, Amazon UK, etc. If you are adding a WooCoomerce system, the marts are your individual sites that use it.
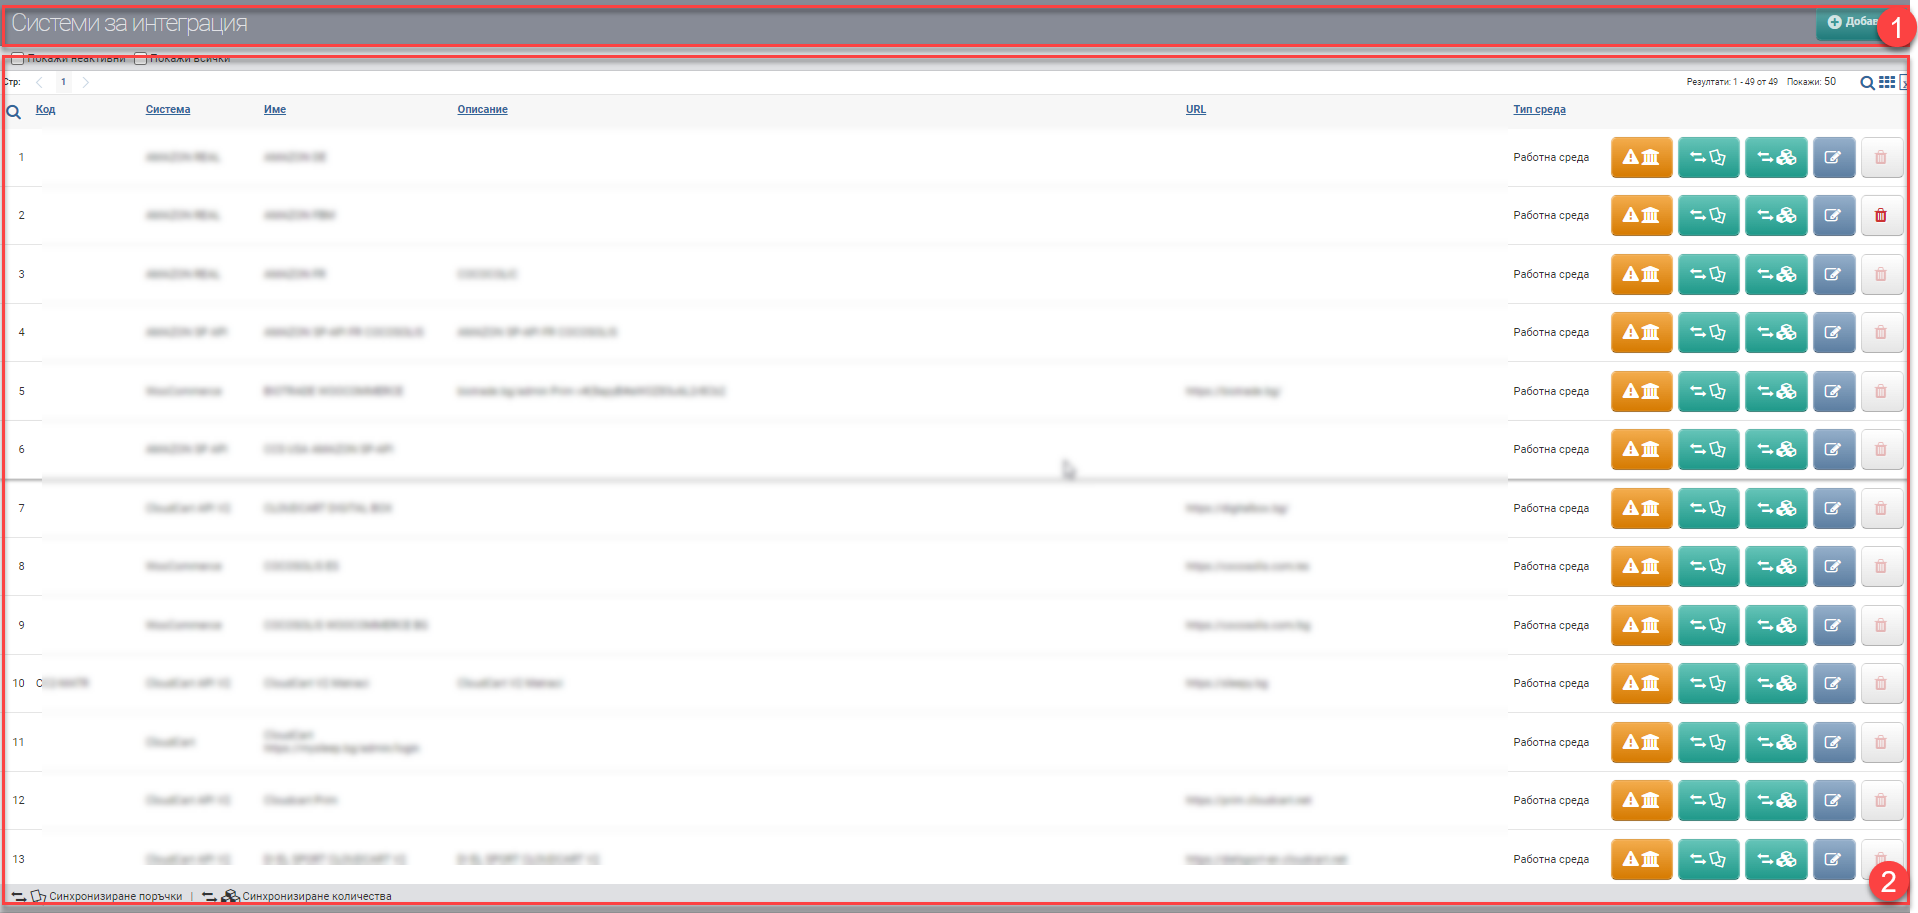
The interface consists of a Header (1) and a List (2):
To add a new sales channel, you need to click the Add to Header button (1). This will open the Add/Edit Sales Channel interface, where you enter the channel details and configure how it works:
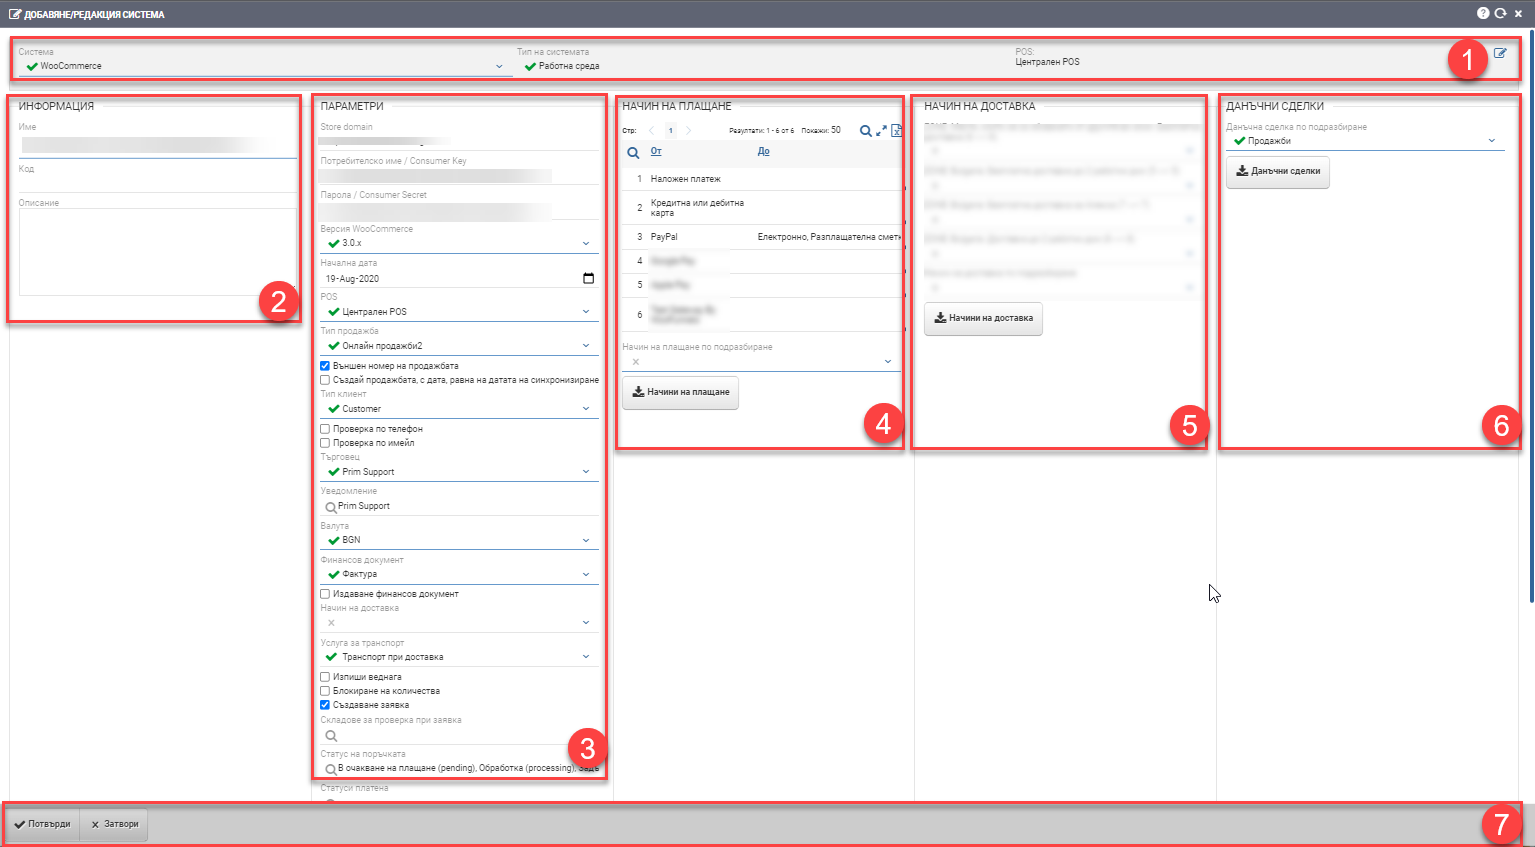
Basic data (1)
You select the integration system, for example, if you are adding a Woocommerce site, then you should select Woocommerce here.
In the System Type field, choose from the following options:
- Production environment
- Working environment
- Test environment
In the POS field, select the POS from which you will sell with the selected integration system. Its settings are extremely important for the correct operation of the system, for this you also have direct access to its parameters in the button at the end of the box.
Information (2)
Here you enter the Name, Code and Description of the sales channel.
Parameters (3)
Be sure to enter Store domain, consumer key and consumer secret first. Put a check in “Used” at the bottom of the interface. Confirm and only then start filling in the settings!
This will populate many of the parameter fields because it will pull data from the integration system.
| Parameters | Description |
| Store domain | |
| Username / Consumer Key | |
| Password / Consumer Secret | |
| Version | |
| Start date | The date from which the system will start synchronising sales. You can also put a back date to synchronize old sales as well. |
| POS | POS from which sales will be created in the system. When making the system settings for integration, you should pay attention to the settings of the specific POS! |
| Type of sale | Sales type that will be used to create sales in the system. |
| External sale number | You specify whether sales will enter the system with an external number. It is recommended to be checked so that sales can vary according to the channel they come from. |
| Create the sale with a date equal to the sync date | When this option is checked, the following will happen to sales: If the sale is dated 05.01, and is pulled on 10.01, it will be recorded with a date of 10.01. Most commonly used in Amazon integrations. |
| Customer type | You specify what type of customer the system should create when you register a new customer. |
| Check by phone | You indicate whether you want to check for an existing customer by phone. If no match is found, the system creates a new counterparty. It is recommended to be checked. The system automatically checks for matches by UIC number, VAT number, SSN where the integration system submits such data. |
| Email verification | You indicate whether you want to check for a substantial customer by email. If no match is found, the system creates a new counterparty. It is recommended to be checked. The system automatically checks for matches by UIC number, VAT number, SSN where the integration system submits such data. |
| Merchant | On behalf of which merchant (user in the system) the sale is created. |
| Notice | Specify which user should be notified if there are problems synchronizing with the integration system. The user receives a Message log with the problematic data. |
| Currency | You specify the default currency in which sales will be created. It is specified only in case the external system does not supply currency. Note the allowed currencies for sales in the POS associated with the system. |
| Financial document | You specify what financial document to create by default. |
| Issue financial document | You specify whether to create a financial document immediately upon registration of the sale. If you have checked that you want to issue immediately, an additional “Pay immediately” checkbox appears, which you use to manage the automatic creation of a payment after issuing the financial document. If both cheques are set, then when a sale is registered in the system, it will issue a default financial document and payment to a selected account/cashier according to the POS settings. |
| Method of delivery | Choose the default delivery method. If there is no explicit mapping of delivery methods (5), the one specified here is automatically taken. |
| Transport service | In most cases, a “Transport to Customer” service is chosen. |
| Write out immediately | The option is used in case you are working with an external warehouse. Recommended only in special cases. |
| Blocking quantities | You specify whether you want to block the sale quantities in the warehouse when registering the sale. |
| Create a request | Specify whether you want to create a request when stock is missing. |
| Warehouses to check on request | You specify which warehouses you want the system to check for available items. If there is no availability and you have placed a check to create a request, the system will create one automatically. If you do not specify a specific warehouse here, the system will check in the warehouse tied to the POS store. |
| Order status | Order statuses on the website or marketplace that the system will synchronize. You only need to select the ones you want to see and process in the system. For example: – Pending payment (pending) – Processing – On-hold – Completed |
| Statuses paid | These are the order statuses for which the system creates a payment. Verification is at the initial pull of the order and at a subsequent check. |
| Issue financial document upon payment | Only “paid” status on subsequent check. For example: an order enters the system with a status of “unpaid”, upon subsequent verification it must be paid. However, if there is no financial document issued with the order, the system will fail to settle the order. By placing a cheque here, you guarantee the issuance of a financial document upon payment. |
| Statuses refused | You specify at which statuses the system will cancel or reverse the imported order. It will be cancelled if there is no discharge in the system or reversed if there is already a discharge created. |
| Synchronization statuses | Specify whether you want the ERP system to update statuses on the site when orders are completed/completed/cancelled. The direction of communication here is from the ERP system to the integration system. |
| Status to be sent when the sale is completed | Choose which status will be sent from the ERP system to the site when the sale is completed. |
| Status to be sent when the sale is completed | You choose which status will be sent from the ERP system to the site when the sale is listed and paid. |
| Status to be sent when cancelling the sale | Choose which status will be sent from the ERP system to the site when the sale is cancelled. |
| Synchronising quantities | You specify whether to synchronize quantities from the ERP system to the website. This synchronization only passes data available or not ( YES/NO), not what is the available quantity. |
| Warehouses for synchronising quantities | From a drop-down menu, select which warehouses the quantities will be synchronized from. If you don’t select anything, it will only sync from the POS warehouse. |
| Synchronize exact quantities | You specify whether to synchronize exact quantities from the ERP system to the site. This synchronisation feeds accurate quantities, not just whether an item is available or not. |
| Remove items when stock reaches 0 | You specify whether to remove an item on the site when it is out of stock in the ERP system. |
| Used | In order for an integration system to be active and visible in the list of integrations, you must check this box. |
Payment methods (4)
Here you specify which payment method from the website corresponds to which payment method from the POS. Below is a button to automatically pick up/sync payment methods from the site.
Delivery methods (5)
Here you specify which shipping method from the website corresponds to which shipping method from the POS. Below is a button to automatically pick up shipping methods from the site.
Tax transactions (6)
You specify a default tax transaction with which to create sales.
Buttons (7)
The Confirm button saves any changes you have made, and the Close button returns you to the previous interface without saving your changes.